Email:
info@sparqee.com

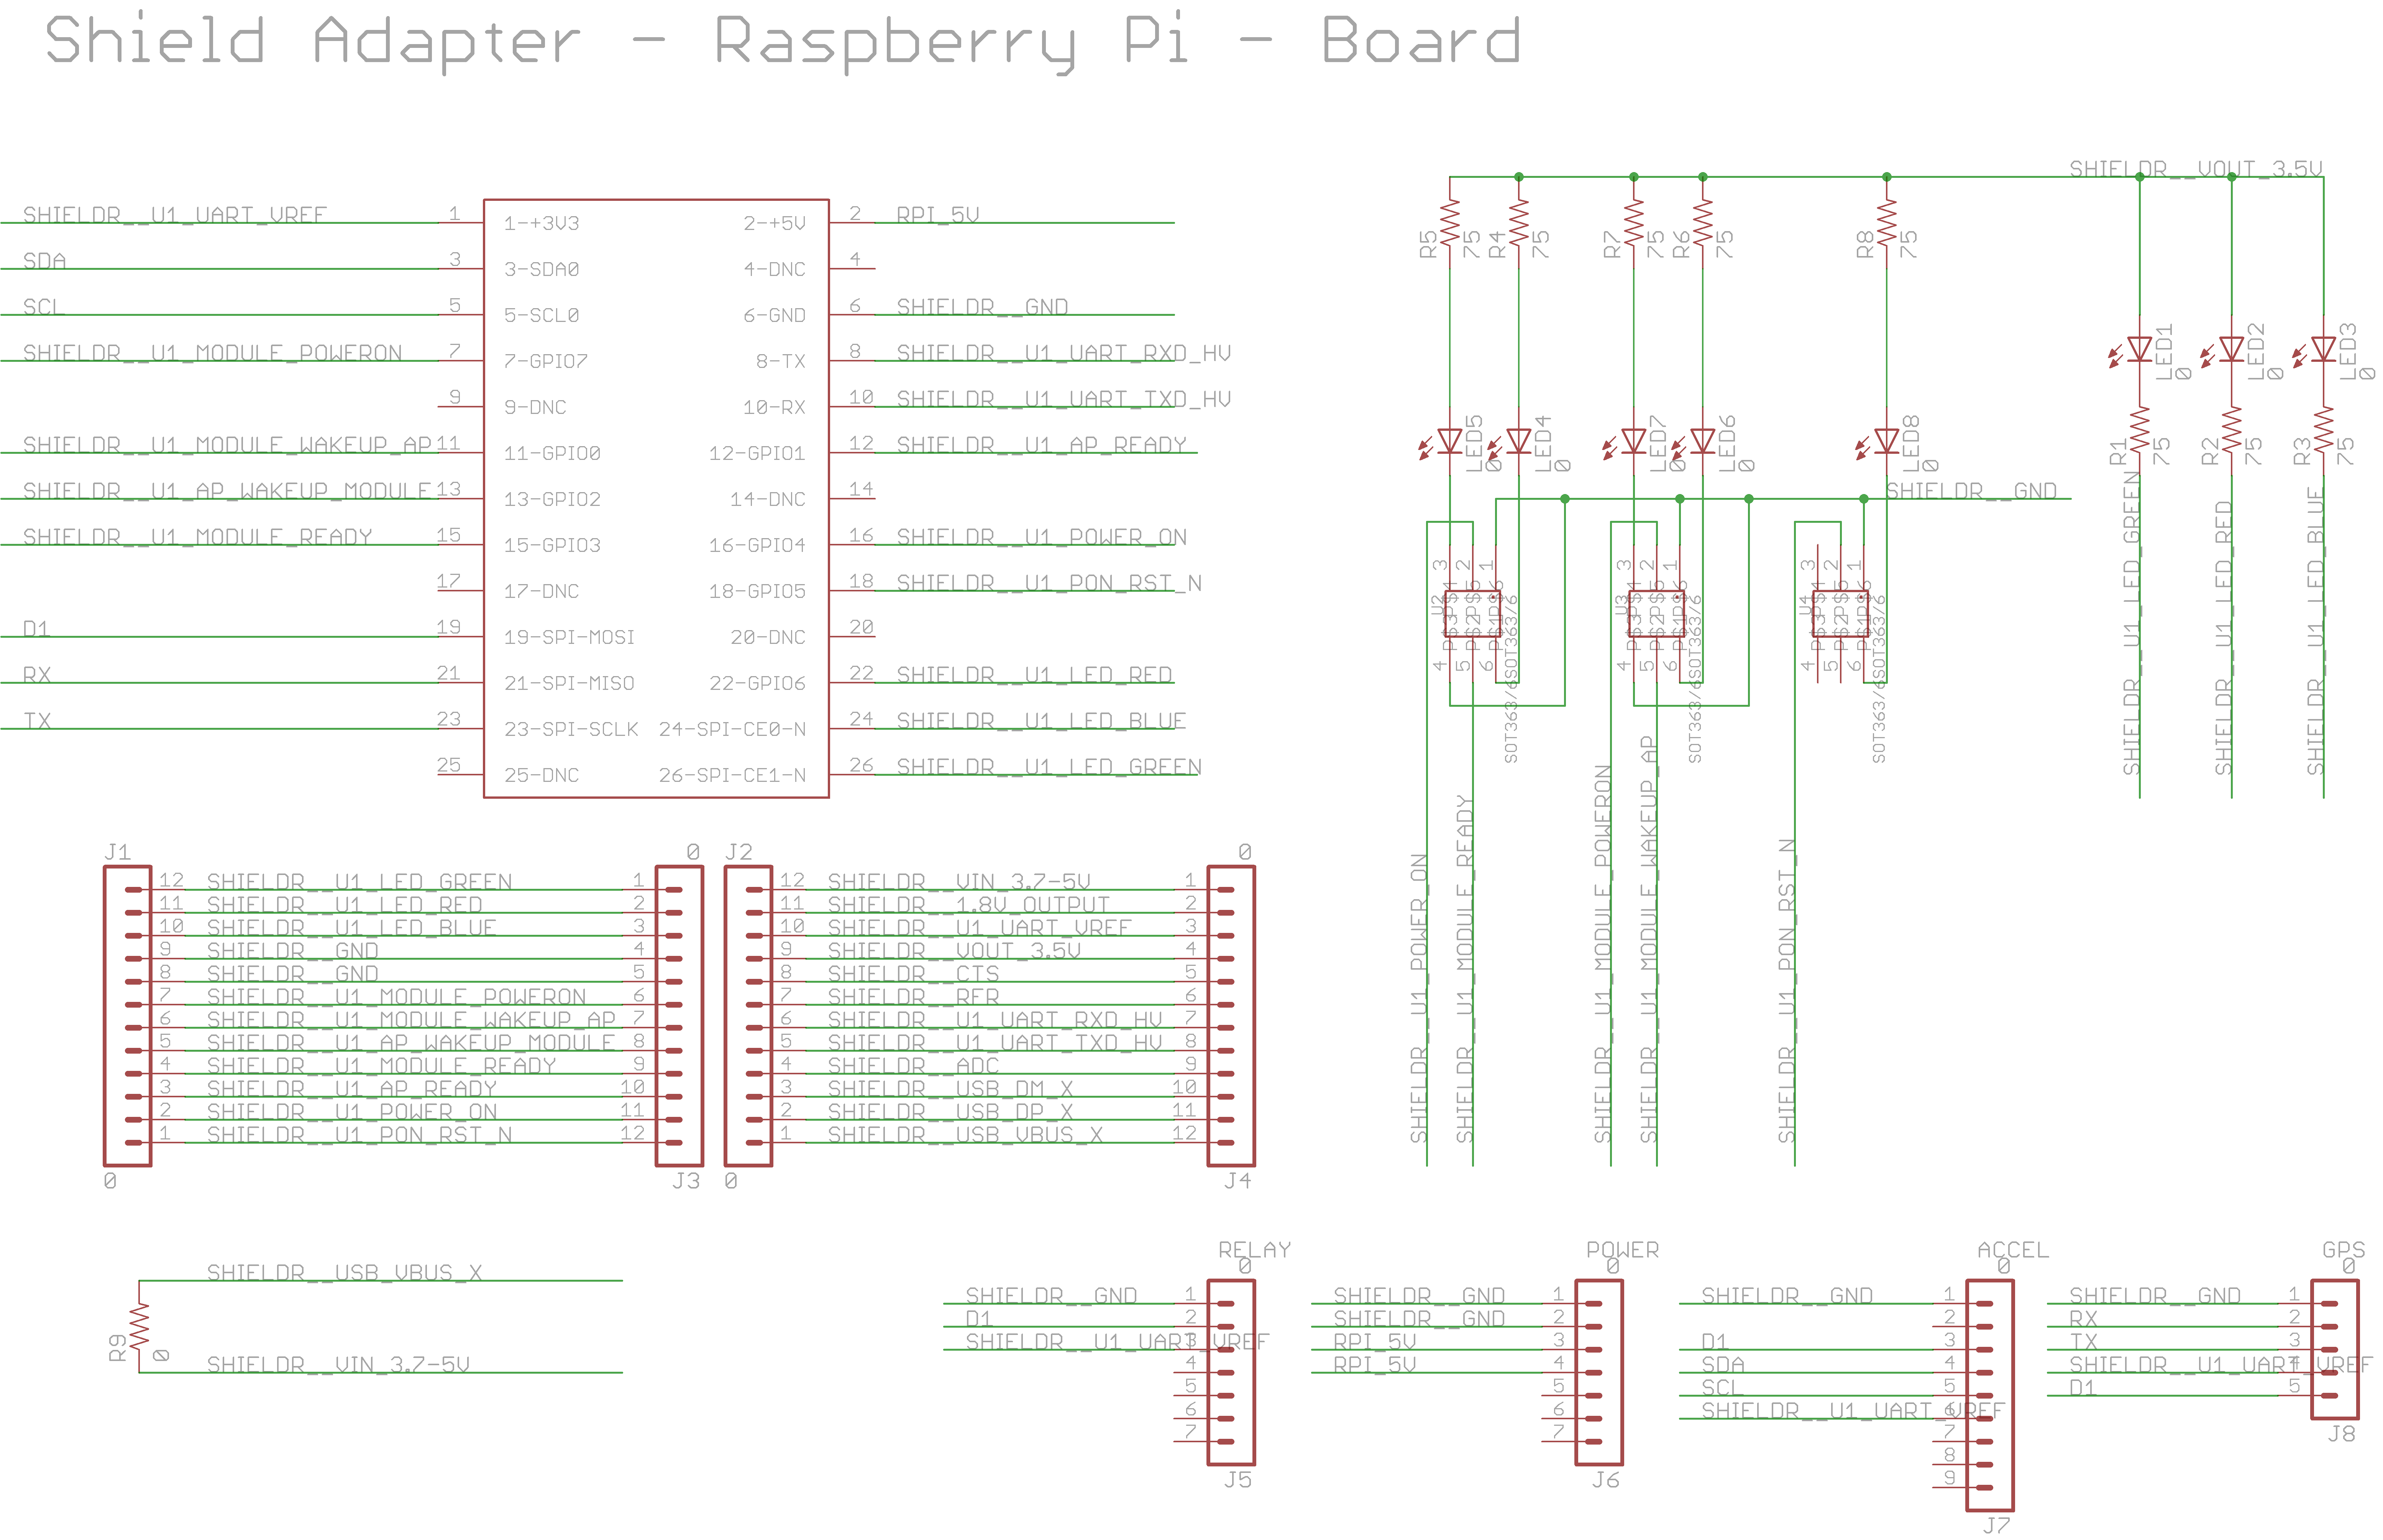
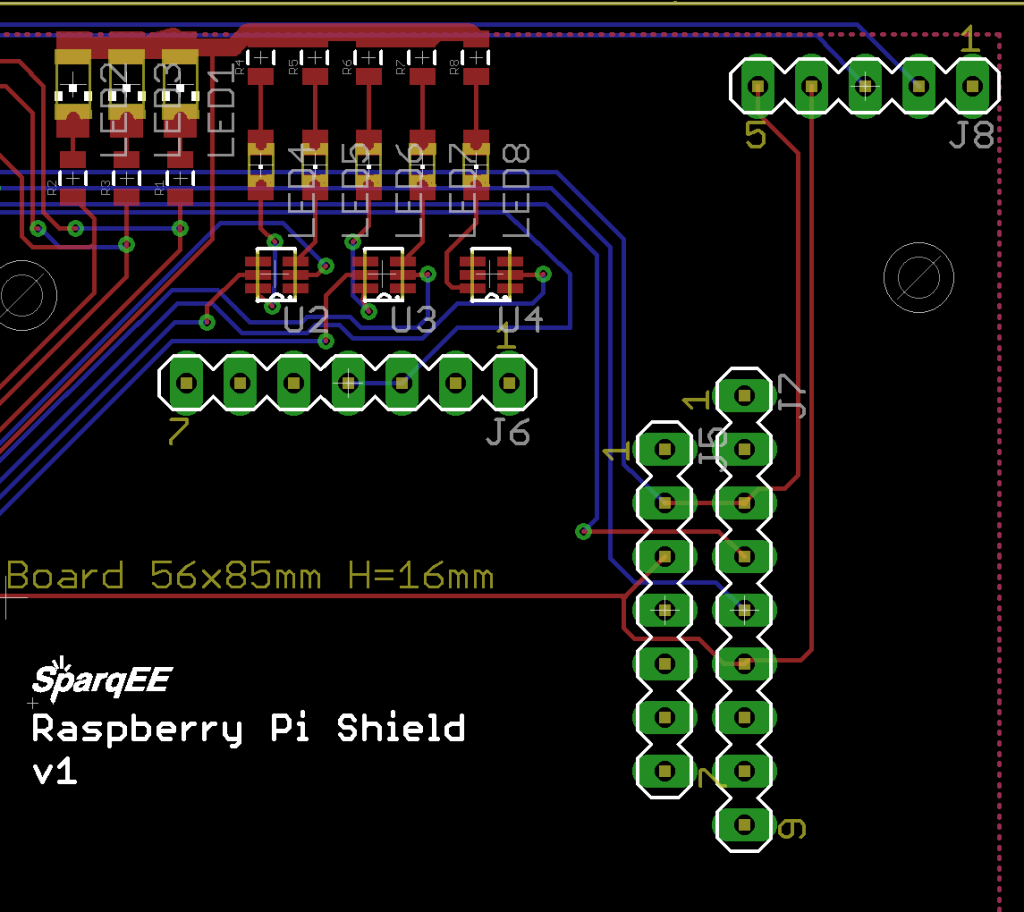
SparqEE ShieldRv1.0
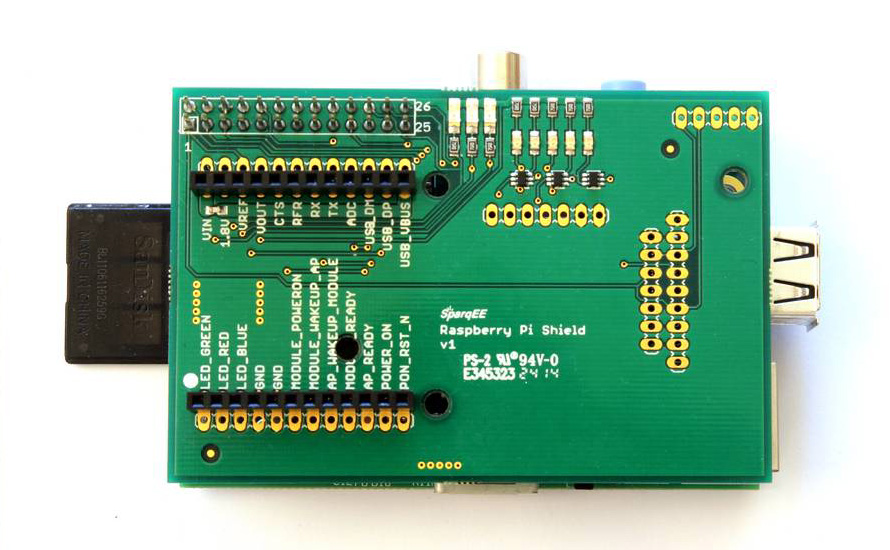
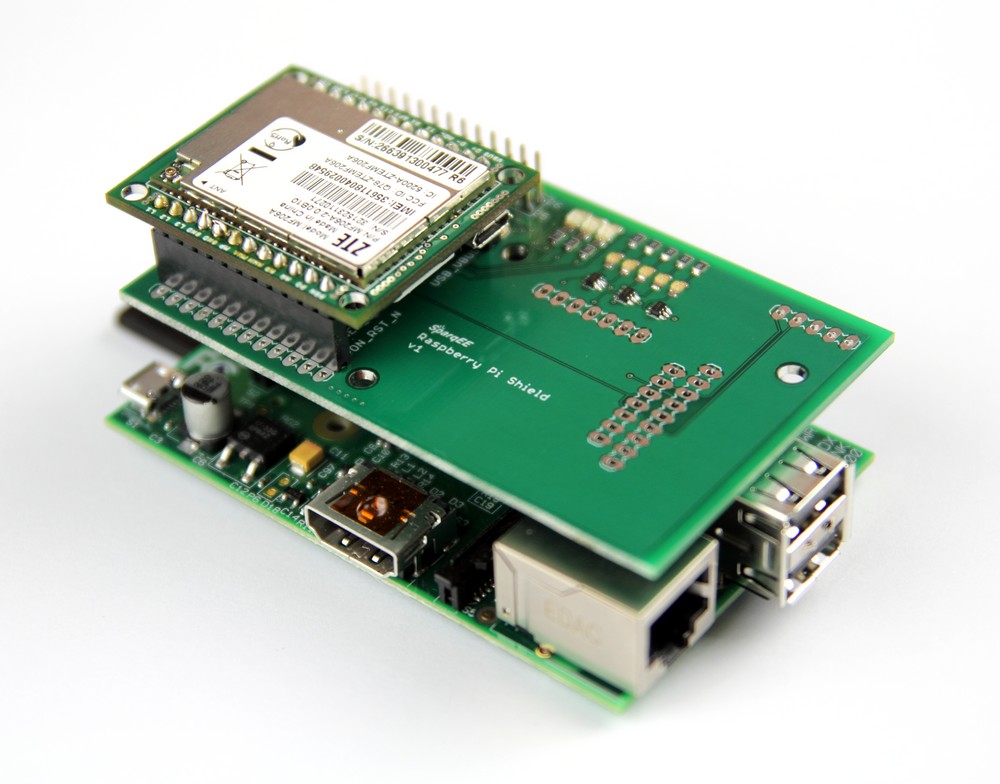
Connects the CELLv1.0 to the Raspberry Pi without any additional wiring!
The ShieldRv1.0 is a shield or connecting board that connects the CELLv1.0 to the Raspberry Pi without any additional wiring. It also provides LEDs for the CELLv1.0 status lines. In addition, breakouts are provided for the four additional SparqEE boards (ACCELv1.0, GPSv1.0, POWERv1.0, RELAYv1.0) if the user prefers to directly connect any of those boards to the shield.
Physical
- 56mm x 85mm (2.20″ x 3.35″)
Operating Temperature
- -40°C to +85°C
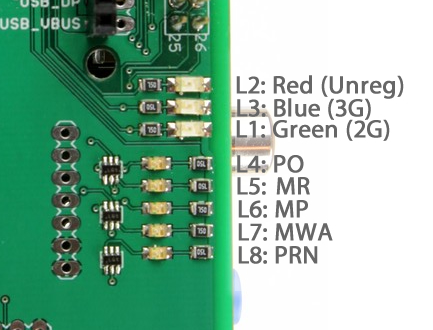
LED mapping:
Other Pins:
Code:
Note: Make sure you setup the Raspberry Pi fully, as described through our “Full initial installation,” before attempting these examples.
Raspberry Pi: Talk directly to the CELLv1.0 - ShieldP
From the command line, execute the following command to talk directly to the CELLv1.0:
sudo minicom -b 115200 -o -D /dev/ttyAMA0
If you don’t have minicom, install it with the following command:
sudo apt-get install minicom
Raspberry Pi: Full initial installation (works for B+ too) - ShieldP
Additional tools necessary:
- Raspberry Pi (Works with B+ works too)
- USB micro cable (for power)
- 8GB SD card for Raspberry Pi (above 4GB should work)
- USB keyboard
- HDMI monitor and cable
- Ethernet cable connected to the internet
- A computer with WinSCP and access to the same network as the Raspberry Pi
Plug the CELLv1.0 into the Raspberry Pi Shield and the Raspberry Pi Shield into the Raspberry Pi. Micro USB cable to the Raspberry Pi and Micro USB cable to the CELLv1.0 is required. The CELLv1.0 must also have an antenna attached and SIM card in order to communicate over the cellular network. This Raspberry Pi requires additional connection through either an Ethernet cable or keyboard and HDMI monitor is used to connect to the Raspberry Pi. The Raspberry Pi also must be booted with a specific OS.
Installation:
- Download:
- NOOBS_v1_3_9 from http://www.raspberrypi.org/downloads/
- “MAIN ZIP” file from http://www.sparqee.com/code/raspberryPi_shieldR_v1/RaspberryPi_setup2.zip
- Unzip the archive
- Format your SD card using the SD Card Association’s formatting tool.
- NOTE: Windows version is included in MAIN ZIP
- NOTE: Original sourced from: https://www.sdcard.org/downloads/formatter_4/eula_windows/
- Install and run the Formatting Tool on your machine
- Click on the “Option” menu, Set “Quick Format,” Set “FORMAT SIZE ADJUSTMENT” option to “ON”
- Check that the SD card you inserted matches the one selected by the Tool
- Click the “Format” button
- Raspian OS installation
- Unzip “NOOBS_v1_3_9.zip” onto the SD card
- NOTE: OS is included in MAIN ZIP
- NOTE: Original sourced from: http://www.raspberrypi.org/downloads
- Insert the SD card into the Raspberry Pi
- Power the Raspberry Pi using the USB to micro cable, HDMI for video, and keyboard
- To Press enter to select Raspbian, press ‘l’ to install your language and keyboard, press ‘i’ to install and press enter for “yes”
- After booting select “finish”
- Using the keyboard and monitor, login to the Raspberry Pi
- user/pass – pi/raspberry
- Find the IP address of the Raspberry Pi in order to WinSCP files over (the Raspberry Pi is setup with DHCP so the ethernet cable should be plugged into a network with a DHCP server and internet to install required packages)
- Execute $ ifconfig
- The IP address is to the right of “inet addr:”
- SCP to the above IP address
- Transfer remaining files to “/home/pi” including:
- cmdline.txt
- inittab
- test_v1.py
- Install required libraries:
- NOTE: Original sourced from: https://pypi.python.org/pypi/RPi.GPIO
sudo apt-get install python-usb
sudo apt-get install python-serial
wget http://pypi.python.org/packages/source/R/RPi.GPIO/RPi.GPIO-0.5.3a.tar.gz
tar zxf RPi.GPIO-0.5.3a.tar.gz
cd RPi.GPIO-0.5.3a/
(may need if the following fails) sudo apt-get update
sudo apt-get install python-dev python3-dev
sudo python setup.py install
- OPTIONAL: Americanize keyboard and time:
- Format your SD card using the SD Card Association’s formatting tool.
- Transfer files to the “/home/pi” directory:
- cmdline.txt
- inittab
- test_v1.py
- Replace the original “cmdline.txt” with the command
sudo cp cmdline.txt /boot/cmdline.txt
- Replace the original “inittab” with the command
sudo cp inittab /etc/inittab
- Make the script executable with the command
sudo chmod 755 test_v1.py
- Run the test with the command
sudo ./test_v1.py
Test script output plus annotation:
sudo ./test_v1.py
------------------
------------------
---> Main DEBUG INPUTS 1:                 <Inputs before CELLv1.0 powered on>
DEBUG: Inputs
 Module Wakeup AP:  1
 Module Poweron:  1
 Module Ready:  1
------------------
---> Main PO TurnOn:                      <Turns on CELLv1.0>
PO: TurnOn
---> Main DEBUG INPUTS 2:
DEBUG: Inputs                             <Inputs after CELLv1.0 powered on>
 Module Wakeup AP:  1
 Module Poweron:  1
 Module Ready:  0
------------------
ate1                                      <echo enabled>
OK                                        <command executed correctly>
DEBUG: Inputs
 Module Wakeup AP:  1
 Module Poweron:  1
 Module Ready:  0
at+cpin?                                  <device ready>
+CPIN: READY
OK                                        <command returned correctly>
------------------
ate1
OK
DEBUG: Inputs
 Module Wakeup AP:  1
 Module Poweron:  1
 Module Ready:  0
at+cpin?
+CPIN: READY
OK
Before power-on:
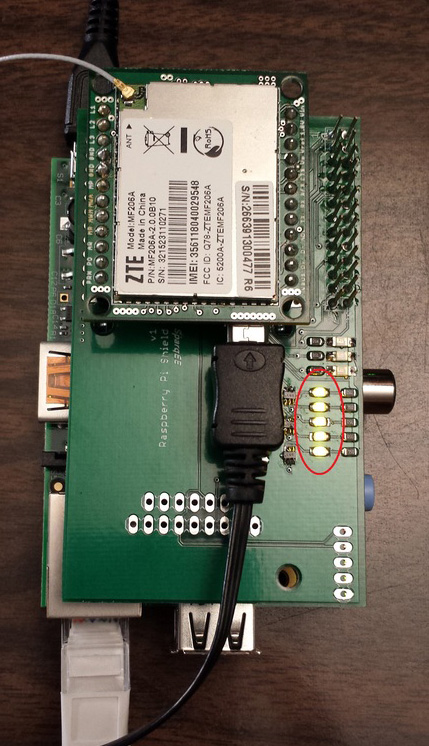
The five yellow LEDs should all be lit.
Power-on, before network connected:
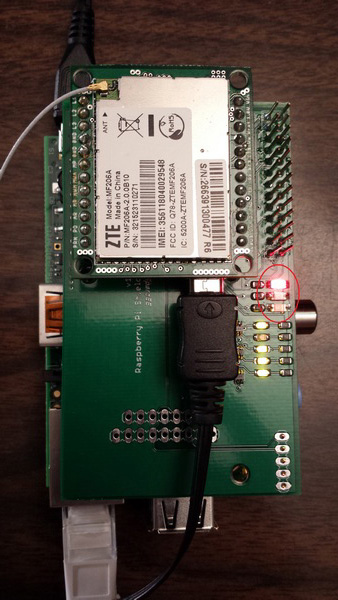
The RED LED should be lit.
Power-on, network connected:
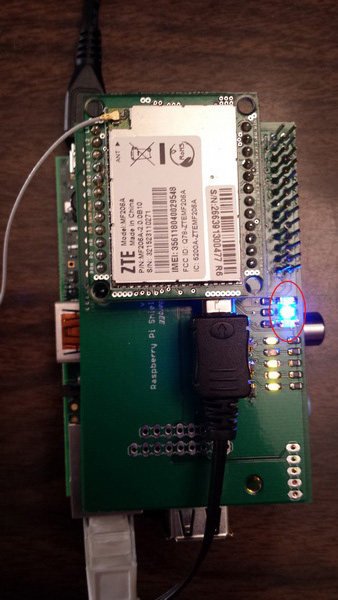
The BLUE or GREEN LED should be lit (Blue is 3G, green is 2G).
Example: (PYTHON) Raspberry Pi - LIBRARY - Basic Commands
#!/usr/bin/python

import SparqEE #version 1
import re
import signal
import sys

# GLOBALS --------------------------------------------------------------------

SparqEE.glob_debug = 5                      #Override global debug print level

def debug(str):
    SparqEE.debug_print( str, SparqEE.debug["DEBUG"] )

def debug2(cmd, ret):
    debug(cmd)
    debug( "---> CMD RET --->: " + str(ret) )
    debug( "---> BUFFER  --->" + SparqEE.buffer )

#-----------------------------------------------------------------------------

try:
    SparqEE.cmd_setup()                     #set-up shield GPIO
    SparqEE.cmd_power()                     #power on
    SparqEE.cmd_connection()                #check cellular connection

    #BASIC AT COMMANDS
    #Nickname                       #at command     #Description

    ret = SparqEE.at_status()       #at_at          #Quick status
    debug2 ("STATUS", ret)

    ret = SparqEE.at_echoOn()       #at_ate1        #Enable command echo
    debug2 ("ECHO", ret)

    ret = SparqEE.at_reg()          #at_creg        #Network registration status
    debug2 ("REG", ret)

    ret = SparqEE.at_nets()         #at_cops        #List available networks
    debug2 ("NETS", ret)

    ret = SparqEE.at_tech()         #at_cnti        #Current tech
    debug2 ("TECH", ret)

    ret = SparqEE.at_sig()          #at_csq         #Signal Quality
    debug2 ("SIG", ret)

#-----------------------------------------------------------------------------

    SparqEE.debug_print( "***END***", SparqEE.debug["WARNING"] )
    SparqEE.cmd_cleanup()                   #clean-up shield GPIO

except:
    SparqEE.debug_print( "***END (exception)***", SparqEE.debug["CRITICAL"] )
    SparqEE.cmd_cleanup()                   #clean-up shield GPIO
    print "Unexpected error:", sys.exc_info()[0]
    raise
Example: (PYTHON) Raspberry Pi - LIBRARY - SMS Command
#!/usr/bin/python

import SparqEE #version 1
import re
import signal
import sys

# GLOBALS --------------------------------------------------------------------

SparqEE.glob_debug = 5              #Override global debug print level

def debug(str):
    SparqEE.debug_print( str, SparqEE.debug["DEBUG"] )

def debug2(cmd, ret):
    debug(cmd)
    debug( "---> CMD RET --->: " + str(ret) )
    debug( "---> BUFFER  --->" + SparqEE.buffer )

#-----------------------------------------------------------------------------

try:
    SparqEE.cmd_setup()             #set-up shield GPIO
    SparqEE.cmd_power()             #power on
    SparqEE.cmd_connection()        #check cellular connection

    #BASIC SMS
    ret = SparqEE.at_sms("+12223334444", "20140902 1:00pm testing sms")
    debug2 ("STATUS", ret)

#-----------------------------------------------------------------------------

    SparqEE.debug_print( "***END***", SparqEE.debug["WARNING"] )
    SparqEE.cmd_cleanup()           #clean-up shield GPIO

except:
    SparqEE.debug_print( "***END (exception)***", SparqEE.debug["CRITICAL"] )
    SparqEE.cmd_cleanup()           #clean-up shield GPIO
    print "Unexpected error:", sys.exc_info()[0]
    raise
Example: (PYTHON) Raspberry Pi - LIBRARY - SMS-over-IP
For people using the SparqSIM
This option uses SMS-over-IP which essentially creates a TCP connection and used an SMS gateway to send the text to an endpoint.
ret = SparqEE.at_webopen()         #at_zipcallOpen      #start call - state 1 open
ret = SparqEE.at_websetup(1,0,"23.253.146.203",9999) #at_zipopen #socketId,type(TCP=0),IP,Port
ret = SparqEE.at_websend(1)        #at_zipsend          #send data
msg = "SABCDWXYZ+12223334444 Hello!\n\n"
ret = SparqEE.at_webmsg(msg)       #at_zipwrite
ret = SparqEE.at_webclose()        #at_zipcallClose     #stop call - state 0 close
You’ll notice the line:
msg = "SABCDWXYZ+12223334444 Hello!\n\n"
The user is ABCD and the pass is WXYZ. You’ll have to use your credentials which are available under your SparqSIM account under “Services”->”Source Credentials”. That line will look something like the following for non ASCII characters:
msg = "S" + chr(0x41) + chr(0x42) + chr(0x43) + chr(0x44) + chr(0x57) + chr(0x58) + chr(0x59) + chr(0x5a) + "+12223334444 Hello!\n\n"
Where 0x41 = ‘A’ … 0x5a = ‘Z’
Example: (PYTHON) Raspberry Pi - LIBRARY - Web Command
#!/usr/bin/python

import SparqEE #version 1
import re
import signal
import sys

# GLOBALS --------------------------------------------------------------------

SparqEE.glob_debug = 5              #Override global debug print level

def debug(str):
    SparqEE.debug_print( str, SparqEE.debug["DEBUG"] )

def debug2(cmd, ret):
    debug(cmd)
    debug( "---> CMD RET --->: " + str(ret) )
    debug( "---> BUFFER  --->" + SparqEE.buffer )

#-----------------------------------------------------------------------------

try:
    SparqEE.cmd_setup()             #set-up shield GPIO
    SparqEE.cmd_power()             #power on
    SparqEE.cmd_connection()        #check cellular connection

    #BASIC WEB QUERY
    #Nickname                                               #at command         #Description
    ret = SparqEE.at_webopen()                              #at_zipcallOpen     #start call - state 1 open
    debug2 ("WEBOPEN", ret)

    ret = SparqEE.at_websetup(1,0,"www.dbunplugged.com",80) #at_zipopen         #socket id,type(UDP=1,TCP=0),hostname/IP,Port
    debug2 ("WEBSETUP", ret)

    ret = SparqEE.at_websend(1)                             #at_zipsend         #send data
    debug2 ("WEBSEND", ret)

    msg = "GET /ip HTTP/1.1\r\nHost: www.dbunplugged.com\r\n\r\n"
    ret = SparqEE.at_webmsg(msg)                            #at_zipwrite
    debug2 ("WEBMSG", ret)

    ret = SparqEE.at_webclose()                             #at_zipcallClose    #stop call - state 0 close
    debug2 ("WEBCLOSE", ret)

#-----------------------------------------------------------------------------

    SparqEE.debug_print( "***END***", SparqEE.debug["WARNING"] )
    SparqEE.cmd_cleanup()           #clean-up shield GPIO

except:
    SparqEE.debug_print( "***END (exception)***", SparqEE.debug["CRITICAL"] )
    SparqEE.cmd_cleanup()           #clean-up shield GPIO
    print "Unexpected error:", sys.exc_info()[0]
    raise
Example: Raspberry Pi/Linux - Internet Connection (IP address using PPP)
BASIC – Raspberry Pi
This example is a quick guide to establish a PPP connection providing you an IP address and internet gateway through the CELLv1.0. This example uses a great script called Sakis3g and attempts to give you the quick and dirty for getting it working with the Raspberry Pi.
Please comment on the forum if you have any questions or something is missing.
Command                                                 Notes
sudo apt-get update                                     Make sure you are up to date
sudo apt-get install ppp                                Install PPP
wget "http://www.sparqee.com/code/cellv1/sakis3g.gz"    Grab the sakis3g script
gunzip sakis3g.gz                                       Unzip it
chmod +x sakis3g                                        Make it executable

Run the Script:
sudo ./sakis3g connect --console --nostorage --pppd APN="Internetd.gdsp" BAUD=115200 CUSTOM_TTY="/dev/ttyAMA0" MODEM="OTHER" OTHER="CUSTOM_TTY" APN_USER="user" APN_PASS="pass"

If everything goes well, you should be presented with something like:
"MF206A connected to DATA ONLY (310410)."
This means it's connected!!!

To validate that you are online, check two things:
1. "ifconfig" - make sure you were assigned an IP address on interface ppp0
2. "curl www.dbunplugged.com/ip" - it should return the public IP address, <br>, and the time

Kill the Script:
sudo ./sakis3g disconnect
BASIC – Linux (tested on Ubuntu 14.04)
Same steps as the Raspberry Pi except the script is going to be something like the following. You may have to change some parameters as noted:
sudo ./sakis3g connect --nostorage --pppd APN="Internetd.gdsp" APN_USER="user" APN_PASS="pass" USBINTERFACE="1" USBDRIVER="option" OTHER="USBMODEM" USBMODEM="19d2:0117"

    OPTION          NOTE
    APN             Should be the APN from your particular provider (typically on the SIM card package)
    APN_USER        Same as APN, but for username.  If none, leave as-is
    APN_PASS        Same as APN, but for password.  If none, leave as-is
    USBINTERFACE    The 'X' digit(s) following the USB modem from /dev/ttyUSBX
    USBMODEM        USB Modem MAC addr from "lsusb" (when the modem is on), ex: 19d2:0117

If everything goes well, you should be presented with something like:
"MF206A connected to DATA ONLY (310410)."
This means it's connected!!!
INTERMEDIATE
Here are two troubleshooting options that work consistently if the modem is having problems connecting. Without legitimate error messages, make sure these two tricks are tried first:
    1. Reset the Modem by:Toggle power (unplug/plug back in)
        -Pull "PRN" to ground momentarily
        -Verify the modem is talking by sending a few "at<enter>" commandsUbuntu 14.04: sudo minicom -b 115200 -o -D /dev/ttyUSB1
    2. Raspberry Pi: sudo minicom -b 115200 -o -D /dev/ttyAMA0
Note: A potential automation fix is to add “ATH” to the dialer script needs in order to hang up previous sessions.
ADVANCED
Interesting options for the sakis3g command:
    OPTION          NOTE
    --console       All from the terminal, no ActiveX gui
    --debug         Debug information
    --googledns     Use google dns servers instead of those provided by the peer
    --interactive   Enter interactive mode versus using the command options
View the Manpages:
    1. sudo ./sakis3g man
        -Helpful options for the command line
        -Automation information (about startup)
    2. sudo ./sakis3g man sakis3g_config
        -Eliminate command line options by putting options in a config file
Troubleshooting Commands:
    Command                       Notes
    tail -f /var/log/messages     Debug information
    tail -f /var/log/syslog       Debug information
    lsusb                         Information about USB devices/drivers
    dmesg                         Debug information
    netstat -nr                   Routing/Networking information
    ifconfig -a                   Networking interfaces
    cat /etc/resolv.conf          Routing information
    http://en.wikipedia.org/wiki/Hayes_command_set
                                  Exhaustive set of commands for modem
Troubleshooting:
Using minicom, see what the SIM card reports for the command

    at+cgdcont=?

With the SparqSIM SIM card, it should include "Internetd.gdsp" and look something like this:

    +CGDCONT: 1,"IP","Internetd.gdsp","0.0.0.0",0,0

If the APN isn't correct, then enter the following and try again:

    at+cgdcont=1,"IP","Internetd.gdsp"
EXAMPLE: (PYTHON) Raspberry Pi - 2nd UART - BitBang/Software Serial
You can use the standard Raspberry Pi UART and functions to capture GPS data over the HW UART or, as demonstrated below, you can use the Raspberry Pi to “Bit Bang” or port “Software Serial” rather than the Hardware one.
The below software Serial port utilizes the great PIGPIO which you can download and install for free at the following URL:
http://abyz.co.uk/rpi/pigpio/download.html
Here’s the file I used from their site and the installation on the Raspberry Pi:
wget abyz.co.uk/rpi/pigpio/pigpio.zip
unzip pigpio.zip
cd PIGPIO
make
sudo make install
#!/usr/bin/python

import sys
import time
import difflib
import pigpio

RX=18

try:
        pi = pigpio.pi()
        pi.set_mode(RX, pigpio.INPUT)
        pi.bb_serial_read_open(RX, 9600, 8)

        print "DATA - SOFTWARE SERIAL:"
        while 1:
                (count, data) = pi.bb_serial_read(RX)
                if count:
                        print data
                time.sleep(1)

except:
        pi.bb_serial_read_close(RX)
        pi.stop()